WYVRN SDK Integration: Adding Haptics and Chroma Lighting to Your Game
Chenshuo Li · · WYVRN Ecosystem
A step-by-step guide to adding Razer lighting and haptic effects to your game with the WYVRN SDK. Get it running in Unreal, Unity or C++ with minimal code and time, no Razer hardware needed.
WYVRN is Razer’s platform for game developers, supporting teams from early development through global launch. It brings together immersive technologies such as spatial audio, HD haptics, and Chroma RGB, alongside game QA tools, game monetization, marketing support, and more.
One of the tools WYVRN offers for creating more immersive gaming experiences is the WYVRN SDK, which lets developers integrate Razer Chroma RGB lighting and Razer Sensa HD Haptics into their games. With the SDK, supported keyboards, mice, headsets, controllers, haptic chairs, and other devices can react to in-game events.
The WYVRN SDK now also supports PS5, but this guide focuses on integration with Razer devices on PC.
WYVRN SDK Integration at a Glance
If you’re considering the WYVRN SDK, one of the first questions is likely to be: how much work does the integration actually take?
On the game side, the answer is fairly simple: three API calls and a list of event names. The effects themselves are configured outside your project. Your game reports what is happening, for example, Jump or LowHealth_On, and a configuration file determines which effect should play on each supported device.
This guide walks through those calls, shows how to add them in Unreal Engine, Unity, or native C++, and how to verify that game events reach the Razer runtime, even without Razer hardware.
Prefer video? The tutorial walks through integration in Unreal Engine, step by step:
How the WYVRN SDK Works
The division of work is what keeps the game-side integration small. Your game has one main job: when something happens, name the event.
For example:
SetEventName("Jump")
The game does not say what color the keyboard should turn or how a haptic device should vibrate. Those decisions live outside the game in the WYVRN configuration, which maps each event name to the corresponding Chroma and haptic effects.
For AAA Studios
For partnered AAA titles that integrate the WYVRN SDK, the studio only defines the list of key game events that should trigger effects and adds those event calls to the game. The WYVRN team then creates those Chroma and haptic effects and builds the configuration file (more on that below).
For Indie Studios
Smaller studios can also integrate the WYVRN SDK. The difference is that the WYVRN team does not design custom effects for them. Instead, they use the WYVRN Effects Library, which includes ready-made Chroma and haptic effects: developers choose a pre-designed effect and call its event name from the game.
A step-by-step guide for this approach is also available in our documentation. Indie studios are advised to join the Razer Indie Lab program for more support with development, QA, monetization, and marketing.
The Three SDK Calls and What They Trigger
On the player’s PC, the Razer software handles the effects separately from the game.
When the SDK starts, the game information is passed to the Razer software and becomes visible in Synapse and the Chroma App.
After that, whenever the game sends an event name, the Razer runtime checks the WYVRN configuration, finds the matching effect, and plays it on the supported devices.
The three core operations look like this:
| Your game calls | What the Razer runtime does |
|---|---|
| InitSDK() | The connection to the Razer runtime starts and the game information becomes available in Synapse and the Chroma App |
| SetEventName("Jump") | The Chroma App looks up "Jump" in the WYVRN configuration and plays the Chroma and haptic effects linked to it |
| UnInitSDK() | The game closes its connection to the Razer runtime |
These are the three core operations used throughout the integration. The exact function names and syntax are slightly different in Unreal Engine, Unity, and native C++, which we will cover later in the guide.
The main advantage of this setup is that the effects stay separate from the game code, and later changes rarely require game patches:
- Changing an existing effect: If you want an existing event to look or feel different, only the configuration and effect need to change. The game code stays the same. For partnered titles, the updated effect can be delivered through the Razer software without a game patch.
- Adding an effect to a new game moment: If the game does not already send an event for that moment, you need to add a new SetEventName call and define the effect linked to it. Because the game code changes, this requires a game update.
A good real-world example is Marvel Rivals. Its WYVRN integration has grown to more than 700 haptic effects and 600 Chroma effects across the seasons. . The principle remains the same: the game sends event names, and the Razer side handles the effects.
WYVRN SDK Integration Process: From Interest to Game Release
For partnered integrations, the WYVRN team designs the effects while your studio handles the event calls. Here's how the work is divided. The next sections cover the technical steps in more detail.
| Stage | You do | The WYVRN team does |
|---|---|---|
| 1. Interest & kickoff | Submit your game details at wyvrn.com/register-your-title to let us know you are interested in integrating the WYVRN SDK. | Reviews your submission and gets in touch to discuss the integration and next steps. |
| 2. Event planning | Share gameplay footage or other game materials and confirm the key moments you want to enhance | Reviews the game and proposes the events that would benefit from effects. Updates the event plan with you where needed. |
| 3. Project setup | Tell us which engine you use. Install Razer Synapse 4 and the Chroma App, then add the WYVRN SDK for Unreal, Unity, or C++. | Provides the relevant SDK resources and, where needed, a sample project for your engine. |
| 4. SDK integration & effect design | Add the core SDK calls and place the agreed event names at the right moments in the game. | Designs the Chroma and haptic effects, builds the WYVRN configuration, and connects each event name to the right effects. |
| 5. Integration check | Run the game and confirm that your event calls are being sent correctly. | Helps troubleshoot the integration if an event is missing or not behaving as expected. |
| 6. Effect testing & review | Share a test build or beta access with the WYVRN team. Test the effects and give feedback. If possible, provide an easy way to reach the relevant game moments. | Tests the effects in-game, reviews them in context, and tunes the Chroma and haptic design based on your feedback. |
| 7. Release | Ship the game with the SDK integration included. | Finalizes the effects and delivers them through Razer software, including future effect updates. |
Before You Start: Razer Apps, SDK Download and Testing Without Hardware
Before you begin, make sure two Razer apps are installed and running on your machine:
• Razer Synapse 4, which manages Razer devices
Install both from and restart your PC when prompted.
Both apps need to be running for InitSDK() to work. If the SDK fails to initialize later, these are the first two things to check.
Both apps need to be running for InitSDK() to work. If the SDK fails to initialize later, these are the first two things to check.
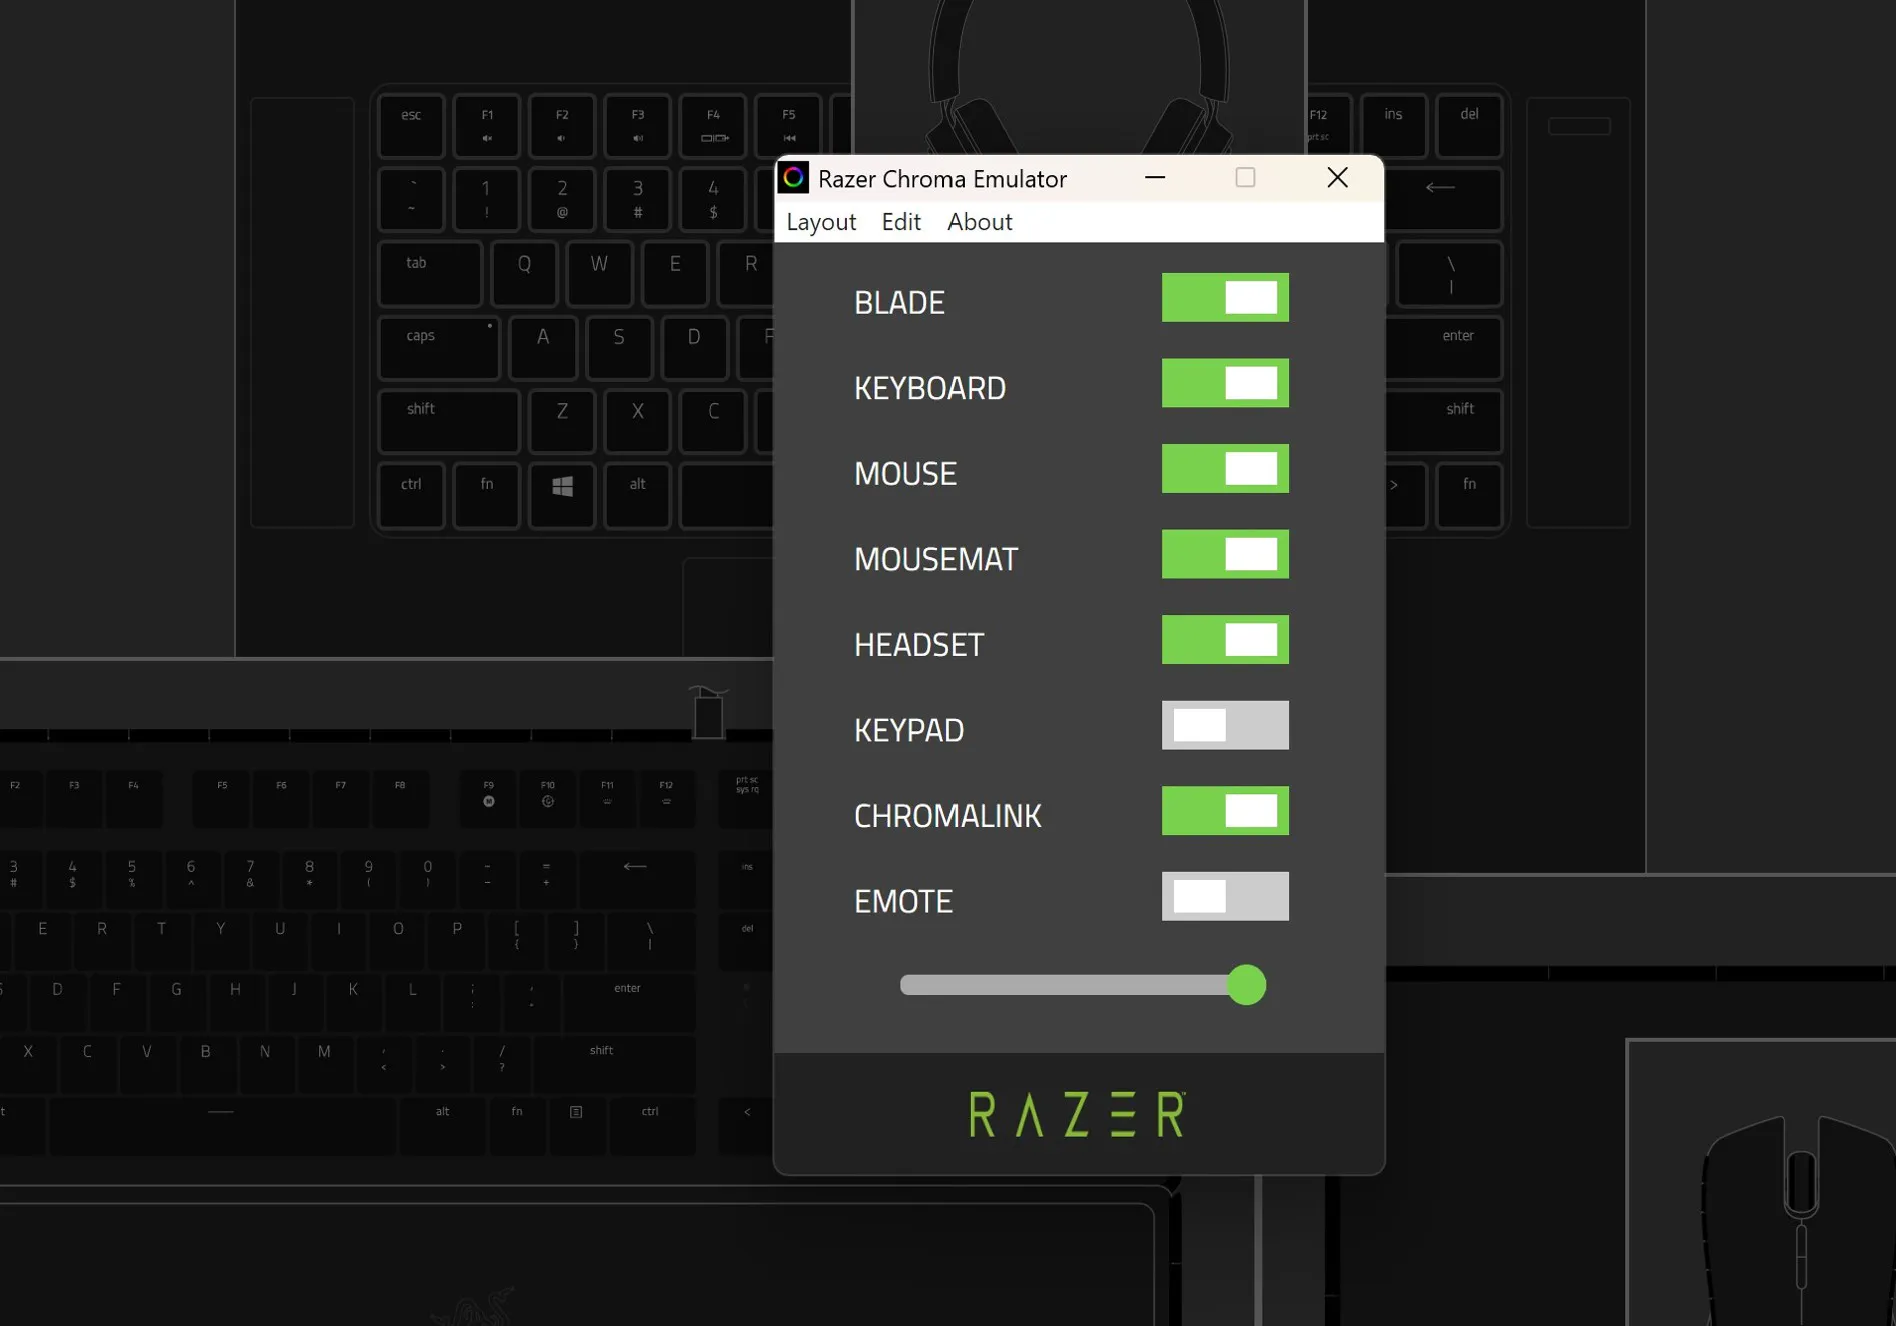
For Chroma, you can use the Chroma Emulator to preview how lighting effects will look across supported devices directly on your screen.
For HD haptics, you need a supported haptic device to actually feel the effects. We strongly recommend testing on hardware to properly evaluate the experience. However, running the HapticService.exe can still confirm that haptic events are being sent correctly, even if no haptic device is connected.
For HD haptics, you need a supported haptic device to actually feel the effects. We strongly recommend testing on hardware to properly evaluate the experience. However, running the HapticService.exe can still confirm that haptic events are being sent correctly, even if no haptic device is connected.
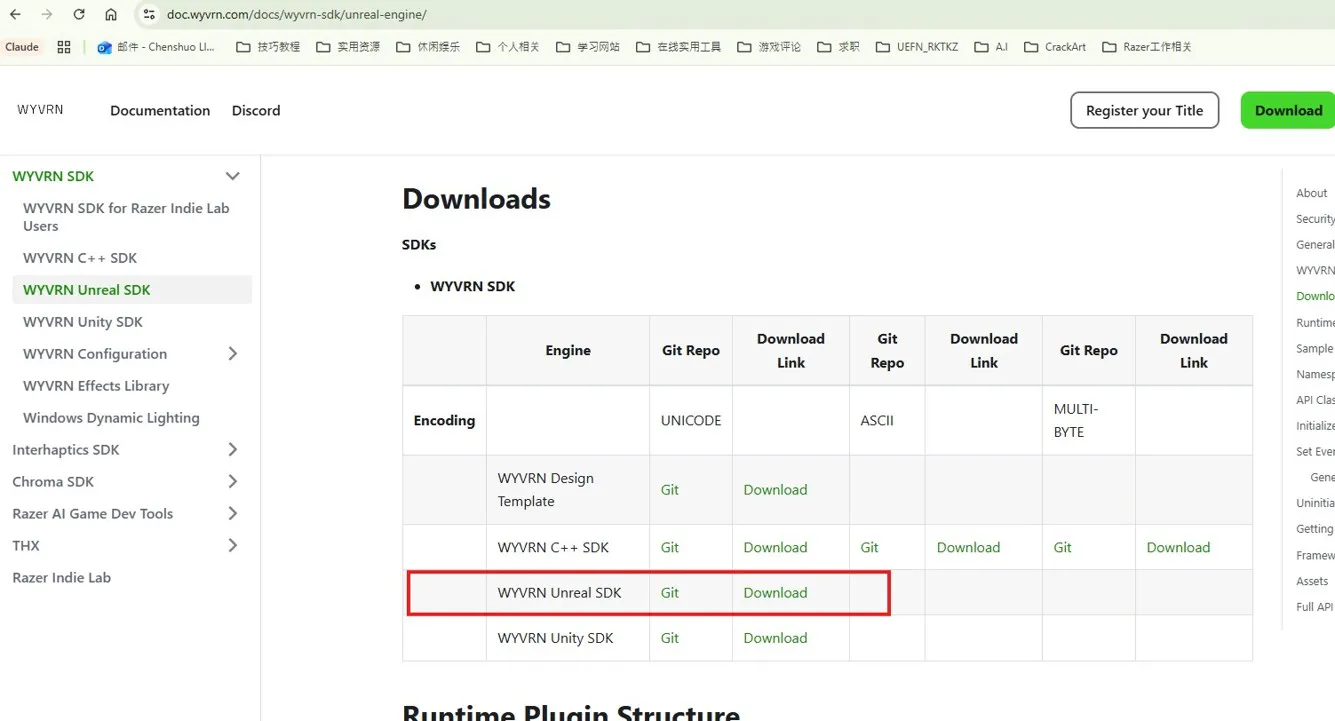
Afterwards get the SDK for your engine from the Downloads table on the WYVRN SDK documentation. Each package also contains a complete sample project, so you can see how the calls work before you add them to your own code.
Engine Integration: Unreal, Unity and C++
The sequence is the same in every game engine. Once you have done it in one, the others are mostly syntax.
- At startup, call InitSDK with an AppInfo struct. 0 means success; any other value means Synapse 4 or the Chroma App is missing or misconfigured. After a successful init, wait about 100 ms before the next SDK call. The SDK needs that time to open its connection to Synapse, and events sent earlier are lost.
- Wherever gameplay should trigger an effect, call SetEventName with the event name.
- At shutdown, call UnInitSDK.
Call init once per game session, not once per level or scene. An object that is destroyed on level load would uninitialize and re-initialize the SDK every time the player changes maps. The engine sections below show where to put the calls.
AppInfo is the only thing you fill in. It has five fields:
AppInfo is the only thing you fill in. It has five fields:
- Title: the name shown in Synapse and the Chroma App
- Description
- Author_Name
- Author_Contact
- Category: 1 for a utility, 2 for a game[
As mentioned before, the function names differ slightly per engine:
| Generic name | Unreal (UWyvrnSDKPluginBPLibrary::) | Unity (WyvrnAPI.) | Native C++ (WyvrnAPI::) |
|---|---|---|---|
| SetEventName | WyvrnSDKInitSDK | CoreInitSDK | CoreInitSDK |
| SetEventName | SetEventName | CoreSetEventName | CoreSetEventName |
| UnInitSDK | WyvrnSDKUnInit | CoreUnInit | CoreUnInit |
Unreal Engine
The WYVRN plugin is designed for Unreal Engine C++ projects. Copy the Plugins folder from the sample project into your project root
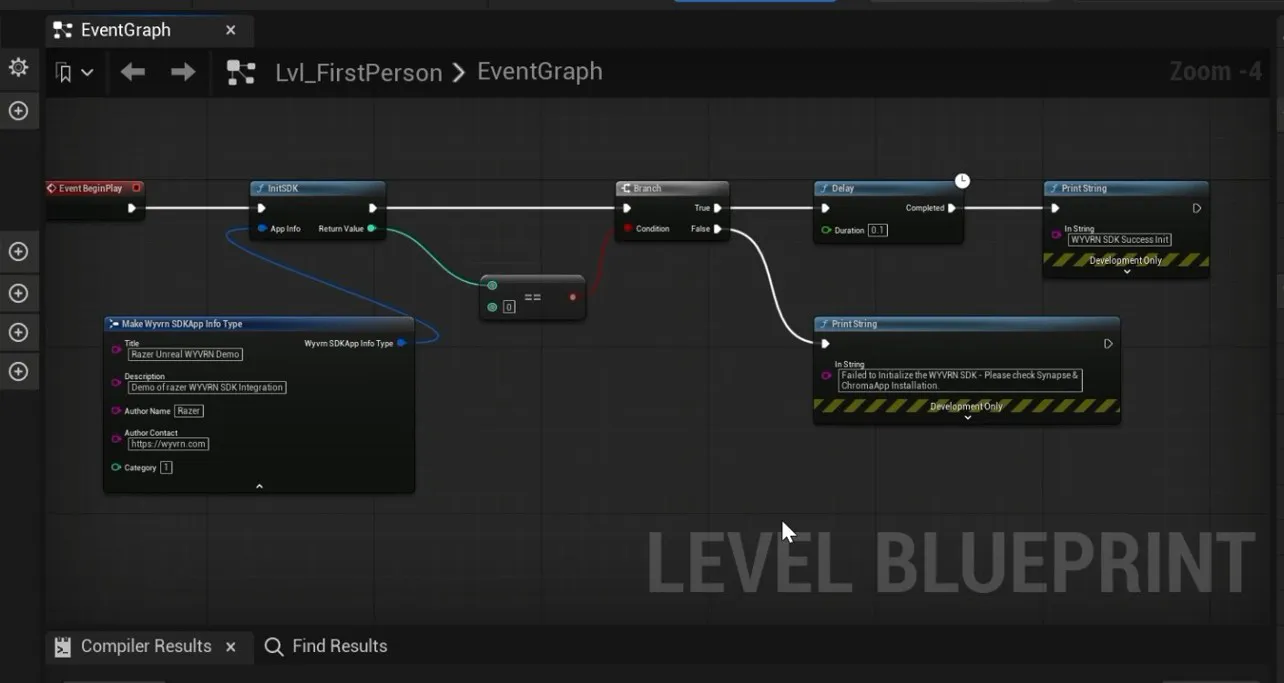
The WYVRN plugin sample scene initializes in the Level Blueprint, which is the quickest way to see it work. In your own game, put the same nodes in your Game Instance (Event Init and Event Shutdown) so the SDK starts once per session rather than once per level.
On the init event, chain these nodes: Make Wyvrn SDKApp Info Type, then InitSDK, then a Branch on Return Value == 0, then Delay 0.1 on the true path.
The WYVRN plugin sample scene initializes in the Level Blueprint, which is the quickest way to see it work. In your own game, put the same nodes in your Game Instance (Event Init and Event Shutdown) so the SDK starts once per session rather than once per level.
On the init event, chain these nodes: Make Wyvrn SDKApp Info Type, then InitSDK, then a Branch on Return Value == 0, then Delay 0.1 on the true path.
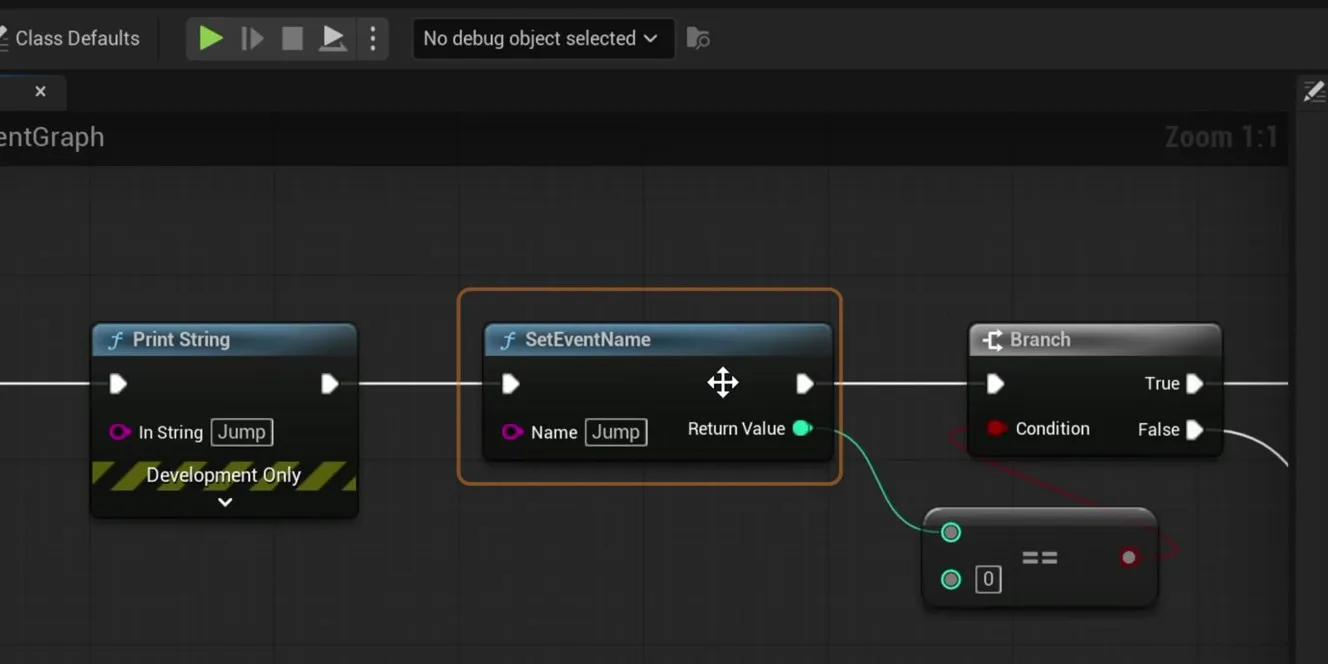
For the jump event, open BP_FirstPersonCharacter, find the jump input and add SetEventName with Jump.
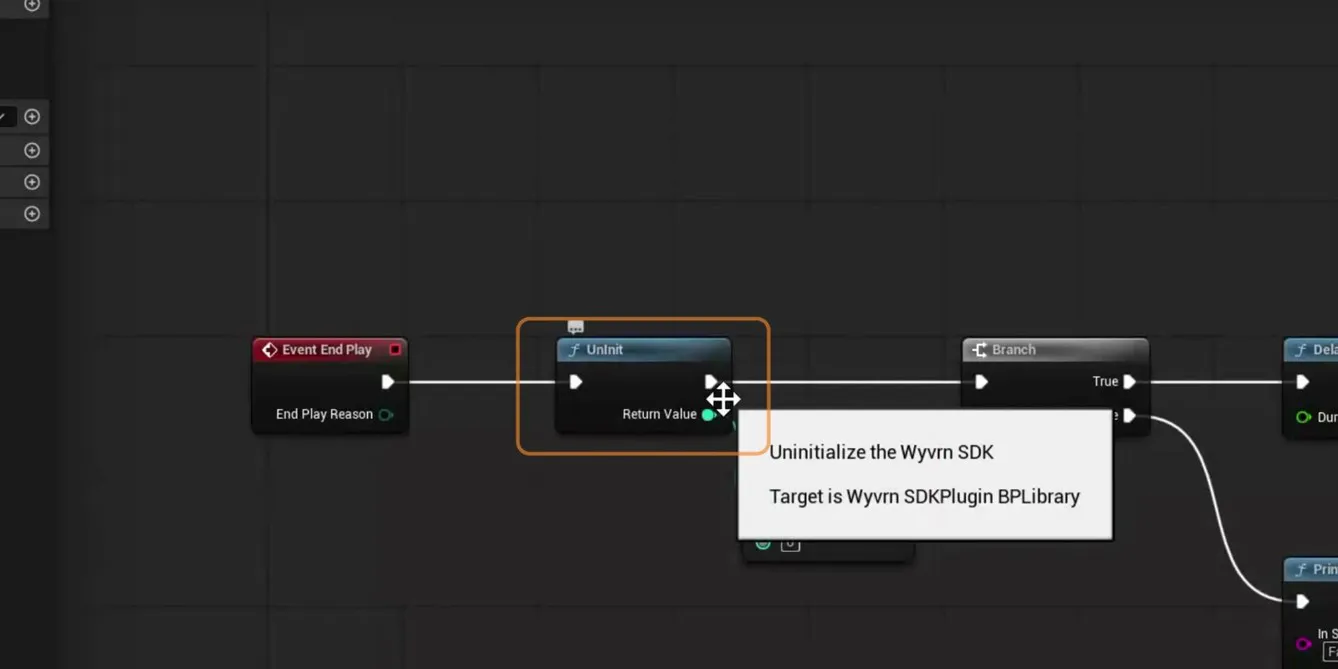
On shutdown (Event EndPlay in the sample), call UnInitSDK.
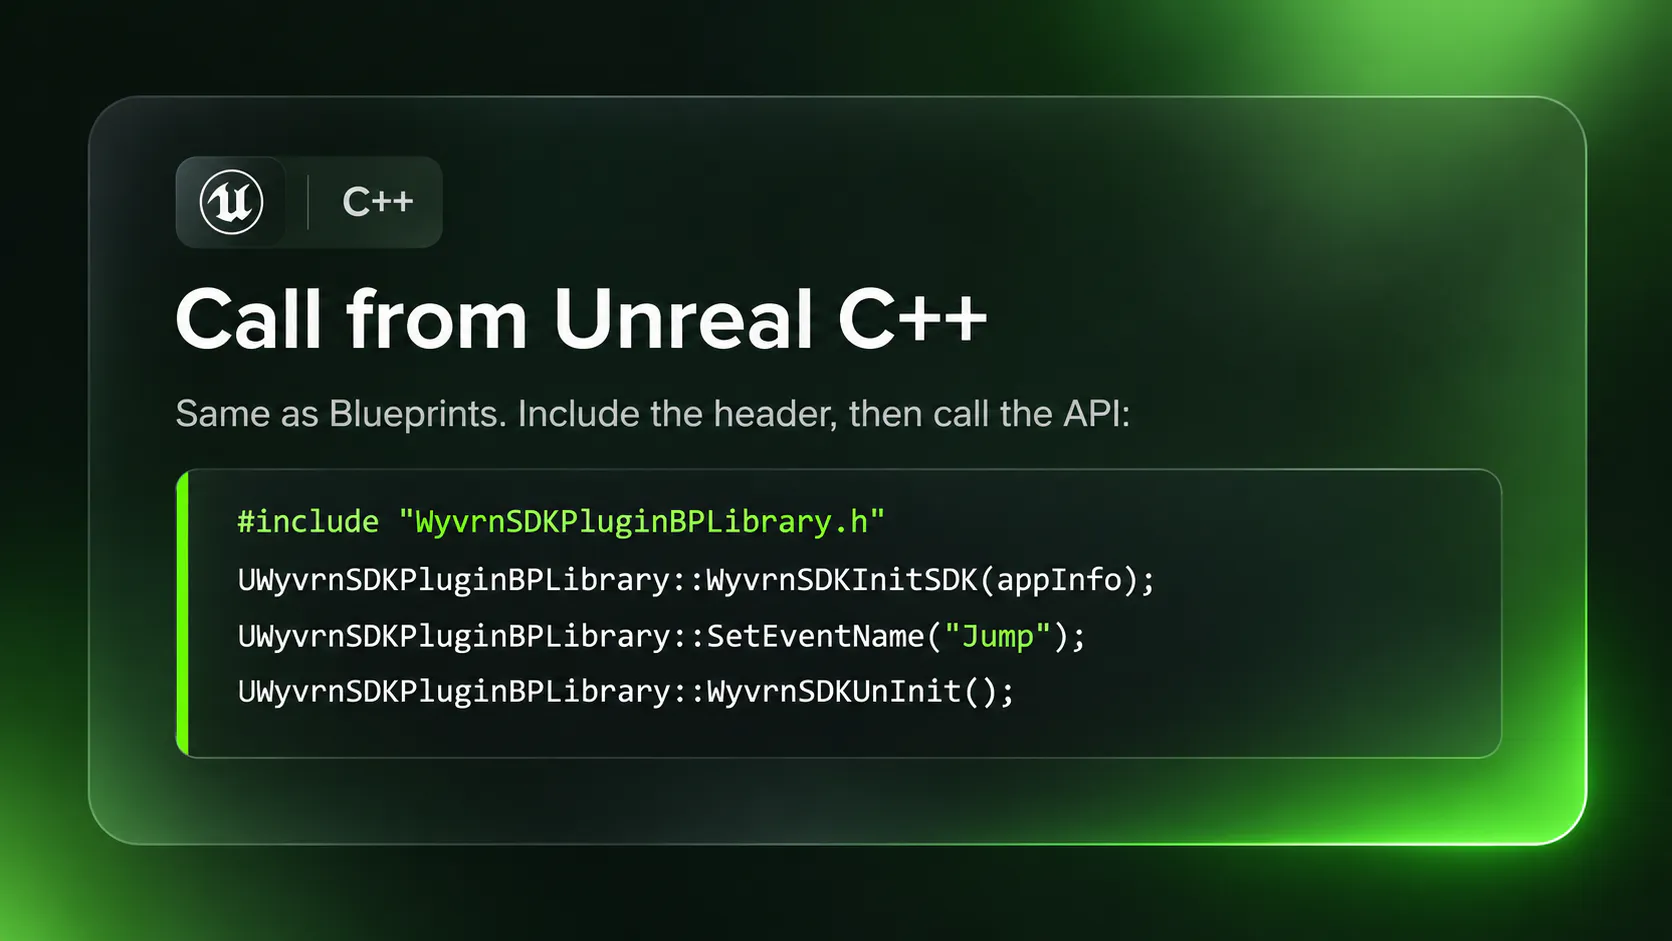
In C++, the same calls go through the plugin’s Blueprint function library. This version initializes in a Game Instance and only sends events after the 100 ms delay has passed:
#include "WyvrnSDKPluginBPLibrary.h"

void UMyGameInstance::Init()
{
    Super::Init();

    FWyvrnSDKAppInfoType AppInfo;
    AppInfo.Title          = TEXT("My Game");
    AppInfo.Description    = TEXT("A game using Razer WYVRN SDK");
    AppInfo.Author_Name    = TEXT("My Studio");
    AppInfo.Author_Contact = TEXT("https://mystudio.example");
    AppInfo.Category       = 2; // 2 = game

    const int32 Result = UWyvrnSDKPluginBPLibrary::WyvrnSDKInitSDK(AppInfo);
    if (Result != 0)
    {
        UE_LOG(LogTemp, Warning,
            TEXT("WYVRN init failed (%d). Check Synapse 4 and the Chroma App."), Result);
        return;
    }

    // Give the SDK 100 ms to connect to Synapse before sending events.
    // bWyvrnReady is a bool member declared in your Game Instance header.
    FTimerHandle Handle;
    GetTimerManager().SetTimer(Handle, [this]() { bWyvrnReady = true; }, 0.1f, false);
}

void UMyGameInstance::SendWyvrnEvent(const FString& EventName)
{
    if (bWyvrnReady)
    {
        UWyvrnSDKPluginBPLibrary::SetEventName(EventName);
    }
}

void UMyGameInstance::Shutdown()
{
    if (bWyvrnReady)
    {
        UWyvrnSDKPluginBPLibrary::WyvrnSDKUnInit();
    }
    Super::Shutdown();
}
Your character then calls SendWyvrnEvent(TEXT("Jump")) from its jump handler.
SampleGameWyvrnBP.cpp in the sample project has the full compilable version.
Unity
In Package Manager, choose Add package from disk and select the package.json file in the SDK folder. Then add using WyvrnSDK; to your script.
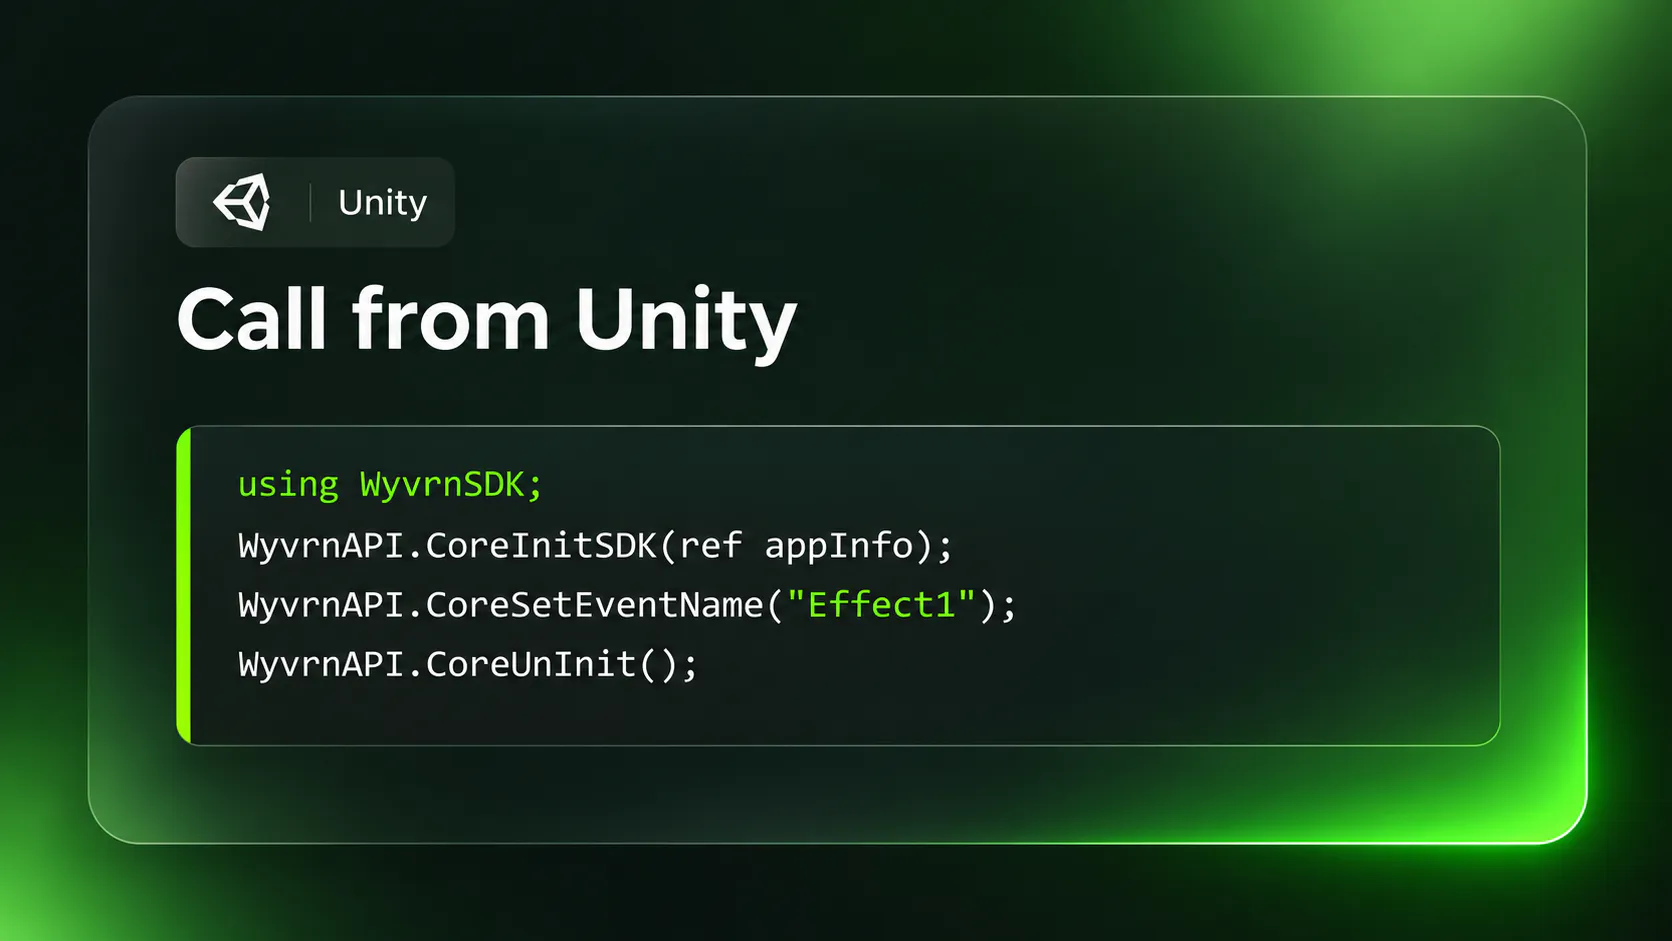
Put this component on a GameObject in your first scene. DontDestroyOnLoad keeps it alive across scene changes, so the SDK starts once and shuts down once:
using System.Collections;
using UnityEngine;
using WyvrnSDK;

public class WyvrnManager : MonoBehaviour
{
    private bool _ready = false;

    void Awake() => DontDestroyOnLoad(gameObject);

    void Start() => StartCoroutine(InitWyvrn());

    IEnumerator InitWyvrn()
    {
        if (!WyvrnAPI.IsWyvrnSDKAvailable())
        {
            Debug.LogWarning("WYVRN DLL not found. Are Synapse 4 and the Chroma App installed?");
            yield break;
        }

        var appInfo = new APPINFOTYPE
        {
            Title = "My Game",
            Description = "A game using Razer WYVRN SDK",
            Author_Name = "My Studio",
            Author_Contact = "https://mystudio.example",
            Category = 2 // 2 = game
        };

        int result = WyvrnAPI.CoreInitSDK(ref appInfo);
        if (result != RazerErrors.RZRESULT_SUCCESS)
        {
            Debug.LogWarning($"WYVRN init failed: {result}");
            yield break;
        }

        // Give the SDK 100 ms to connect to Synapse before sending events.
        yield return new WaitForSeconds(0.1f);
        _ready = true;
    }

    public void SendEvent(string eventName)
    {
        if (_ready) WyvrnAPI.CoreSetEventName(eventName);
    }

    void OnApplicationQuit()
    {
        if (_ready) WyvrnAPI.CoreUnInit();
    }
}
Call SendEvent("Jump") from your jump input handler. IsWyvrnSDKAvailable() checks that the runtime DLL is present. Calling it first means your logs tell you whether the SDK is missing or present but failed to initialize.
Native C++
Add the SDK’s include folder to your project and include the header.
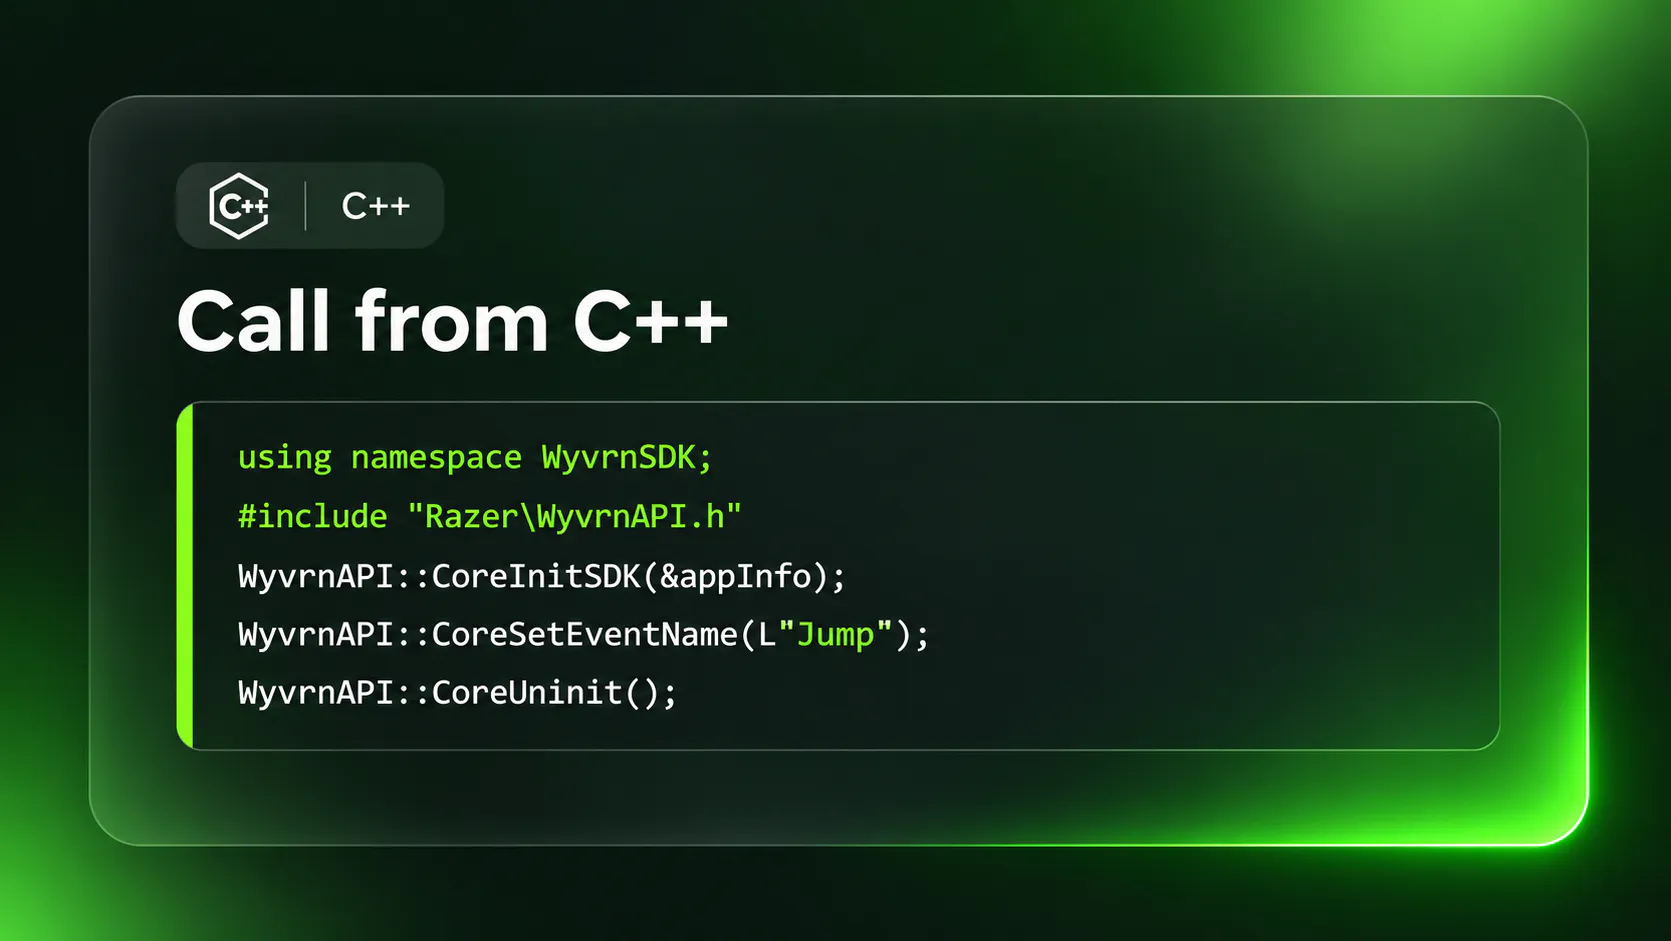
#include "Razer/WyvrnAPI.h"
using namespace WyvrnSDK;

APPINFOTYPE appInfo = {};
// Fill Title, Description, Author_Name, Author_Contact, Category (2 = game)

if (WyvrnAPI::CoreInitSDK(&appInfo) == 0)   // 0 = success
{
    // Wait about 100 ms before the first event.
    WyvrnAPI::CoreSetEventName(L"Jump");      // wide string in the UNICODE build
}

WyvrnAPI::CoreUnInit();                       // at shutdown
The Downloads table has UNICODE, ASCII, and multi-byte sample projects for custom engine integration. Choose carefully the build that matches your engine's encoding. Event names use the same string type.
Sending Gameplay Events: Naming, One-Shot and On/Off Events
With the SDK initialized, the rest of the integration is deciding where to call SetEventName and what to name each event. This part takes the most thought and the least code.
SetEventName takes the event name and nothing else. The name is a key into the WYVRN configuration, which holds the color, intensity, and target device for each effect. On the game side, two rules matter:
SetEventName takes the event name and nothing else. The name is a key into the WYVRN configuration, which holds the color, intensity, and target device for each effect. On the game side, two rules matter:
- Names should be unique and readable. WeaponReload, not Effect3. The WYVRN team designs effects from your event list, so a name that says what happens in the game gets a better first proposal.
- Send the event on the frame the action happens. Players notice even a short delay between what they see and what they feel.
Some events describe a state that lasts, and those come in pairs. When health drops below a threshold, you send LowHealth_On; when it recovers, you send LowHealth_Off. The configuration binds a looping effect, such as a slow red pulse with a heartbeat vibration, to _On and stops it on _Off.
Forgetting the _Off is the most common issue we see in integration reviews: the effect starts and never stops, and players notice. Recovery is not the only exit from a state. Also send _Off when the player dies, pauses, loads a new level, or quits.
For a first pass, wire up 10 to 20 high-priority events and run the checks below. Naming conventions and priority guidance are in the Event Design section of the docs.
Testing and Troubleshooting
Two checks confirm that your events reach the Razer runtime. Neither needs Razer hardware, but both need Synapse 4 and the Chroma App running on the test machine.
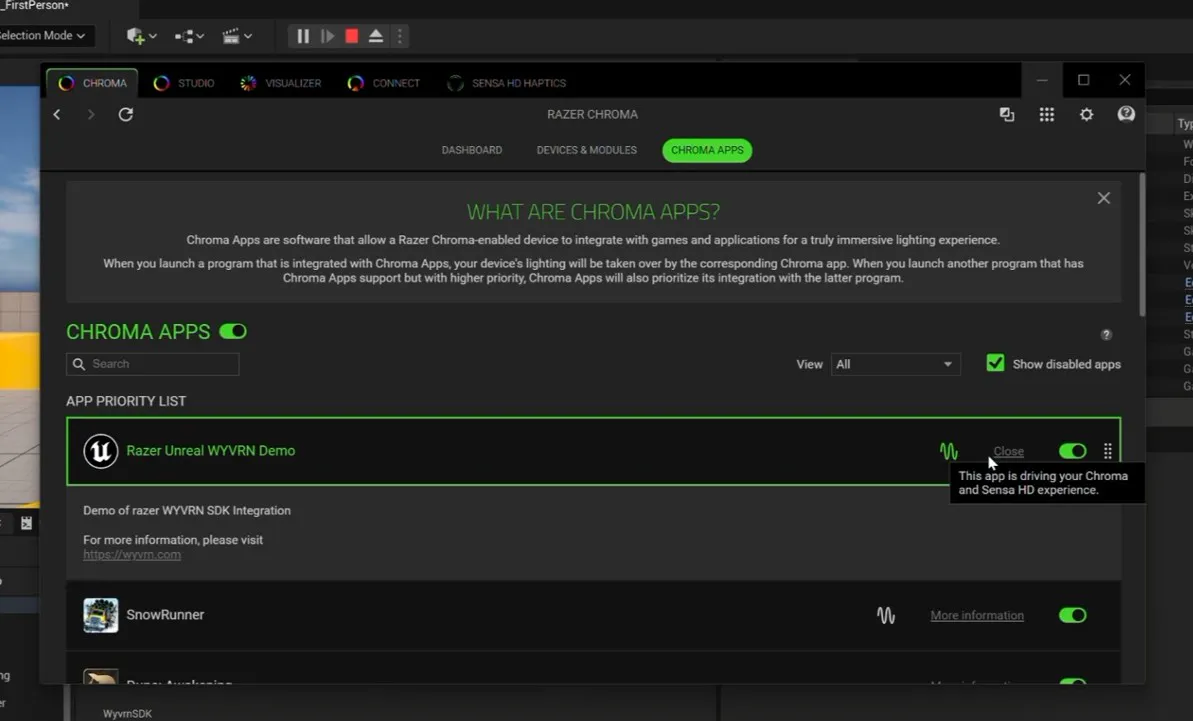
Check 1: initialization. Launch the game, open the Chroma App and go to the CHROMA APPS tab. If your app is in the list, InitSDK succeeded and Synapse has registered it. Move it to the top of the priority list so other Chroma-enabled apps do not take control of the devices.
Check 1: initialization. Launch the game, open the Chroma App and go to the CHROMA APPS tab. If your app is in the list, InitSDK succeeded and Synapse has registered it. Move it to the top of the priority list so other Chroma-enabled apps do not take control of the devices.
Check 2: event delivery. The Haptic Service Dashboard is a local web page that shows every event the Razer runtime receives from your game. It comes with Synapse 4, so there is nothing extra to install. To turn it on, open a command prompt as administrator in C:\Program Files (x86)\Interhaptics\HapticService and run:
HapticService.exe enabledashboard
HapticService.exe restart
Open localhost:8787, launch your game and watch the Event Log tab. You should see load when the game starts and play each time an event fires. Setup details and options are in the dashboard docs.
If a check fails, find the symptom in this table:
HapticService.exe enabledashboard
HapticService.exe restart
Open localhost:8787, launch your game and watch the Event Log tab. You should see load when the game starts and play each time an event fires. Setup details and options are in the dashboard docs.
If a check fails, find the symptom in this table:
| What you see | Likely Cause | What to do |
|---|---|---|
| Your game isn't in the Chroma Apps list | The app title is empty, or the Chroma App is closed | Install both, restart your PC and try again |
| The dashboard page won't open | The dashboard isn't on | Fill in Title in AppInfo and open the Chroma App |
| The Event Log is empty | Logging is off | Run enabledashboard, then restart |
| No load when the game starts | Your game is switched off in the Chroma App | Click Enable under Logs |
| Load shows, but no play | The event fired before the SDK finished starting | Switch it on in the Chroma Apps list |
| Play shows, but you feel nothing | Either no effect is designed for this event yet, or Haptic Source is set to Audio-to-Haptics | Send the event name to the WYVRN team, or set Haptic Source to Sensa HD Games in the Chroma App |
| InitSDK returns an error | Synapse 4 or the Chroma App isn't installed or running | Install both, restart your PC and try again |
The last row is the expected state for any event the WYVRN team has not designed yet. It is also where the next stage begins.
Effect Design, Review and Release
Effect design runs in parallel with your integration. While you add the SDK calls and place the event names, the WYVRN team designs the Chroma and haptic effects for the events agreed during event planning, builds the WYVRN configuration and connects each event name to its effects.
Once your events reach the runtime, share a test build or beta access with the WYVRN team. You test the effects and give feedback; the WYVRN team reviews them in the game and tunes the design. An easy way to reach the key game moments, such as a level select or debug commands, makes this review faster.
At release, the WYVRN team finalizes the effects and delivers them through Razer Synapse/Chroma. Once an effect is bound to an event, it plays on whatever devices the player owns (Chroma and Sensa HD Haptics compatible), with no further change to your code.
For the full API reference and engine-specific details:
Once your events reach the runtime, share a test build or beta access with the WYVRN team. You test the effects and give feedback; the WYVRN team reviews them in the game and tunes the design. An easy way to reach the key game moments, such as a level select or debug commands, makes this review faster.
At release, the WYVRN team finalizes the effects and delivers them through Razer Synapse/Chroma. Once an effect is bound to an event, it plays on whatever devices the player owns (Chroma and Sensa HD Haptics compatible), with no further change to your code.
For the full API reference and engine-specific details:
Small Work for Your Studio, Big Change for Your Players
That's the whole integration: install two Razer apps, add three calls to your engine, place your event names in gameplay, and the game-side work is done. The largest part of the job, designing the effects, is done by the WYVRN team.
The same goes for everything after launch. When your game gets an update, a new season or new content, you go through the same routine with the WYVRN team: send the new event names, and they design the effects. Your studio's workload stays small, and effect updates don't have to wait for your next game patch.
If you haven't registered your title yet, start here. For any questions, the team is happy to help on Discord.
The same goes for everything after launch. When your game gets an update, a new season or new content, you go through the same routine with the WYVRN team: send the new event names, and they design the effects. Your studio's workload stays small, and effect updates don't have to wait for your next game patch.
If you haven't registered your title yet, start here. For any questions, the team is happy to help on Discord.
Chenshuo Li, Immersive Experience Designer